User Guide
Reache is a desktop app that helps busy working professionals manage their large list of contacts by providing an easy-to-use interface to store contacts and organize meetings. Reache is especially suited for professionals who would like to optimize their contact management by using a Command Line Interface (CLI).
This guide will familiarize you with Reache’s interface and features, and provide you all the information you need to begin using Reache.
- 1. Quick start
- 2. Introduction
- 3. Features
- 4. Command Summary
- 5. Contact Fields Summary
- 6. Meeting Fields Summary
1. Quick start
-
Ensure you have Java
11or above installed in your Computer. -
Download the latest
reache.jarfrom here. -
Copy the file to the folder you want to use as the home folder for your Reache.
-
Double-click the file to start the app. The GUI similar to the below should appear in a few seconds.

-
Refer to the Features below for details of each command.
2. Introduction
2.1 Overview
Reache is a contact manager application that helps you:
- Store and organize contacts
- Easily sort and search through your contact list
- Plan and keep track of upcoming meetings
2.2 Interface Guide
Reache’s interface comprises two pages, the Home Page and the Contact Details Page. The Home Page provides an overview of your contacts and meetings, whereas the Contact Details Page displays detailed information about a specific contact. Depending on which page you are on, you will have access to different commands, and be able to accomplish different tasks.
2.2.1 Home Page
Upon launching Reache, you will see the Home Page, which is depicted below. The Home Page displays your entire contact list as well as all upcoming meetings you have planned.
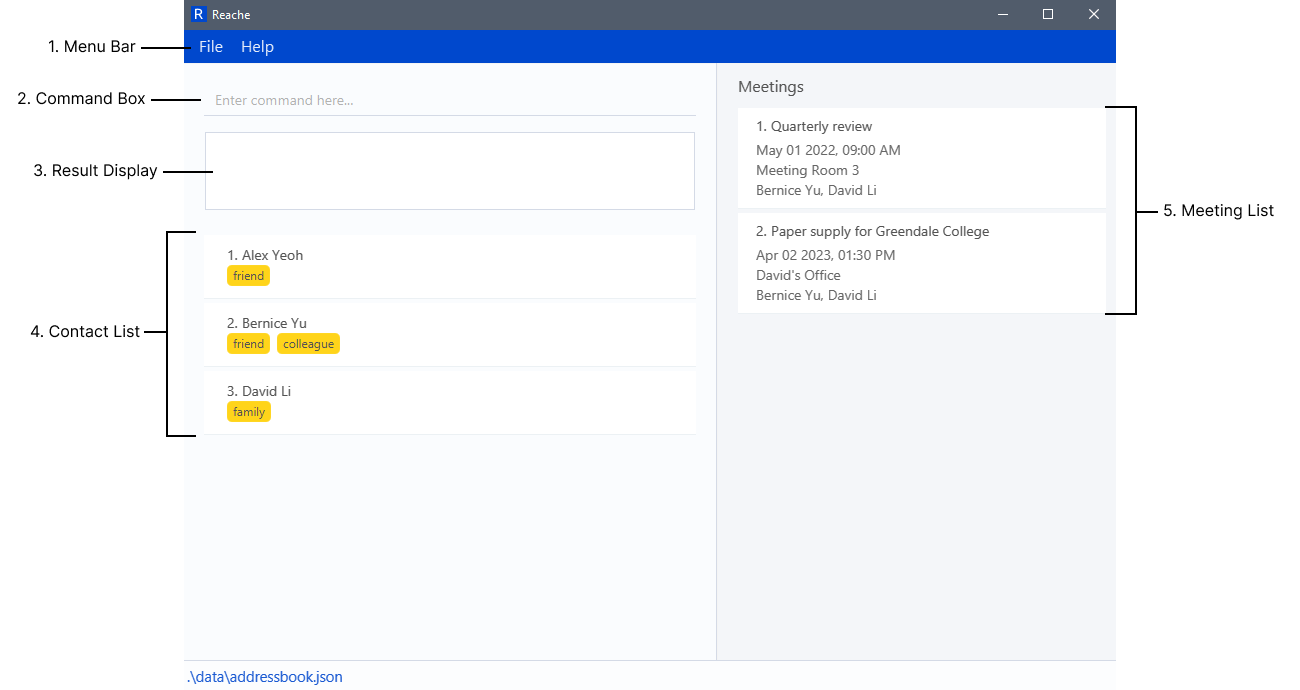
The Home Page contains the following elements:
- Menu Bar: Contains Reache’s options and help.
- Command Box: A dialog box from which you can type commands to use Reache.
- Result Display: When you use the Command Box to enter a command, Reache will show the result of that command here.
- Contact List: A list of all your contacts, sorted alphabetically. Each contact has a corresponding index number, which you can use to refer to that contact in commands.
- Meeting List: A list of all your upcoming meetings, sorted chronologically. As with contacts, each meeting has a corresponding index number for use in commands.
You can find the list of all commands available on the Home Page by visiting the Home Page Command Summary.
2.2.2 Contact Details Page
The Contact Details Page, which is depicted below, displays all the contact information associated with a specific contact.
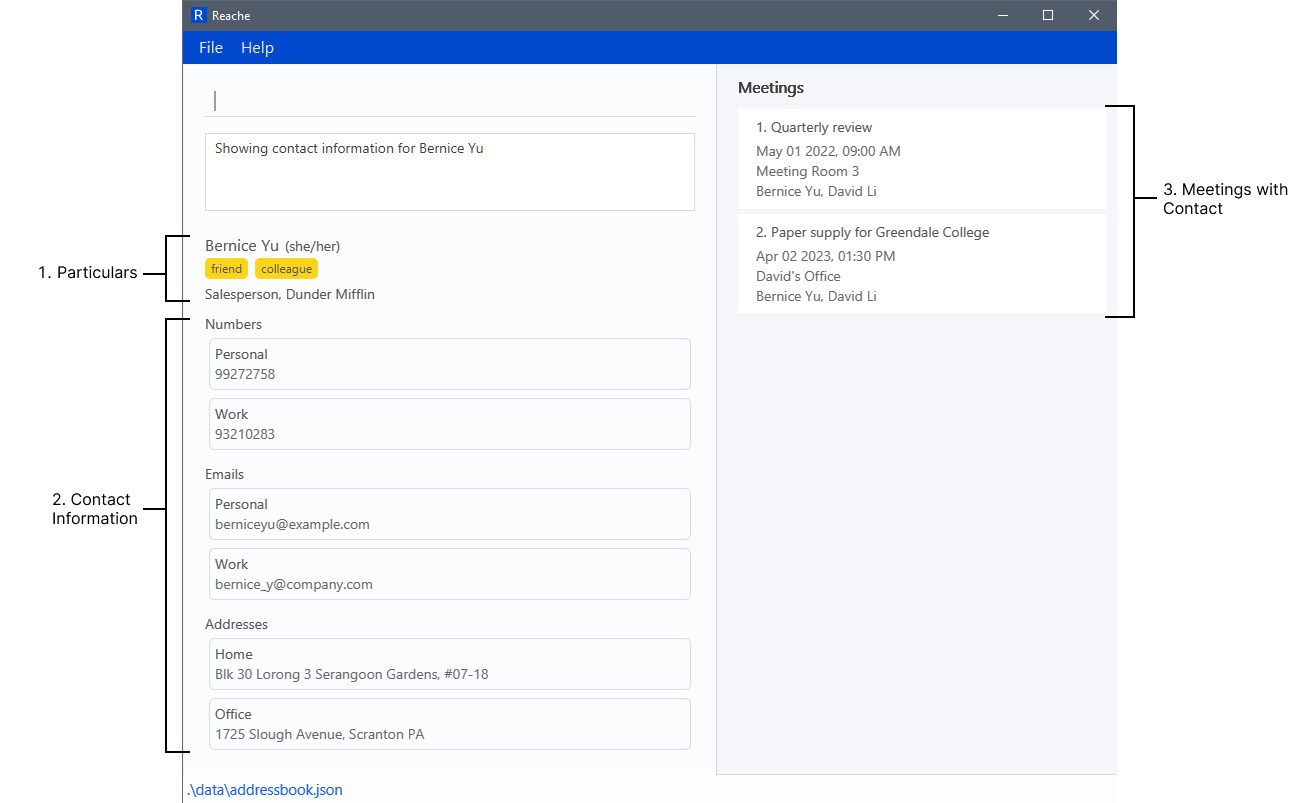
The Contact Details Page contains many of the same elements as the Home Page, like the Menu Bar, Command Box, and Result Display. In addition, it contains the following elements:
-
Particulars: Consists of a contact’s name, pronouns, job title, company, and tags. Tags are descriptive keywords that help you identify a person. For example, you might assign a contact the tag “Friend” to indicate that they are your friend.
-
Contact Information: A contact’s phone numbers, email addresses, and physical addresses. Reache lets you assign custom labels to these fields to help you organize a contact’s information. For example, a person might have a personal phone number and an office phone number.
-
Meetings with Contact: Whereas the Meeting List in the Home Page displays all your upcoming meetings, the Contact Details Page only displays upcoming meetings that involve the contact being viewed.
You can find the list of all commands available on the Contact Details Page by visiting the Contact Details Page Command Summary.
Now that you are familiar with Reache’s interface, we recommend visiting Getting Started With Reache to begin using the application.
2.3 Getting Started with Reache
If you are a first time user of Reache, we highly recommend following these two step-by-step tutorials to get familiar with the product.
In the contacts tutorial, you will learn how to add your contact information to Reache.
In the meetings tutorial, you will learn how to schedule and track your meetings using Reache.
Experienced users should skip this section.
2.3.1 Tutorial 1: Managing Contacts with Reache
In this tutorial we will be adding your personal contact information to Reache.
- Launch Reache from the folder in which it is located by double clicking on it. You will see the Home Page shown below with some sample contacts.
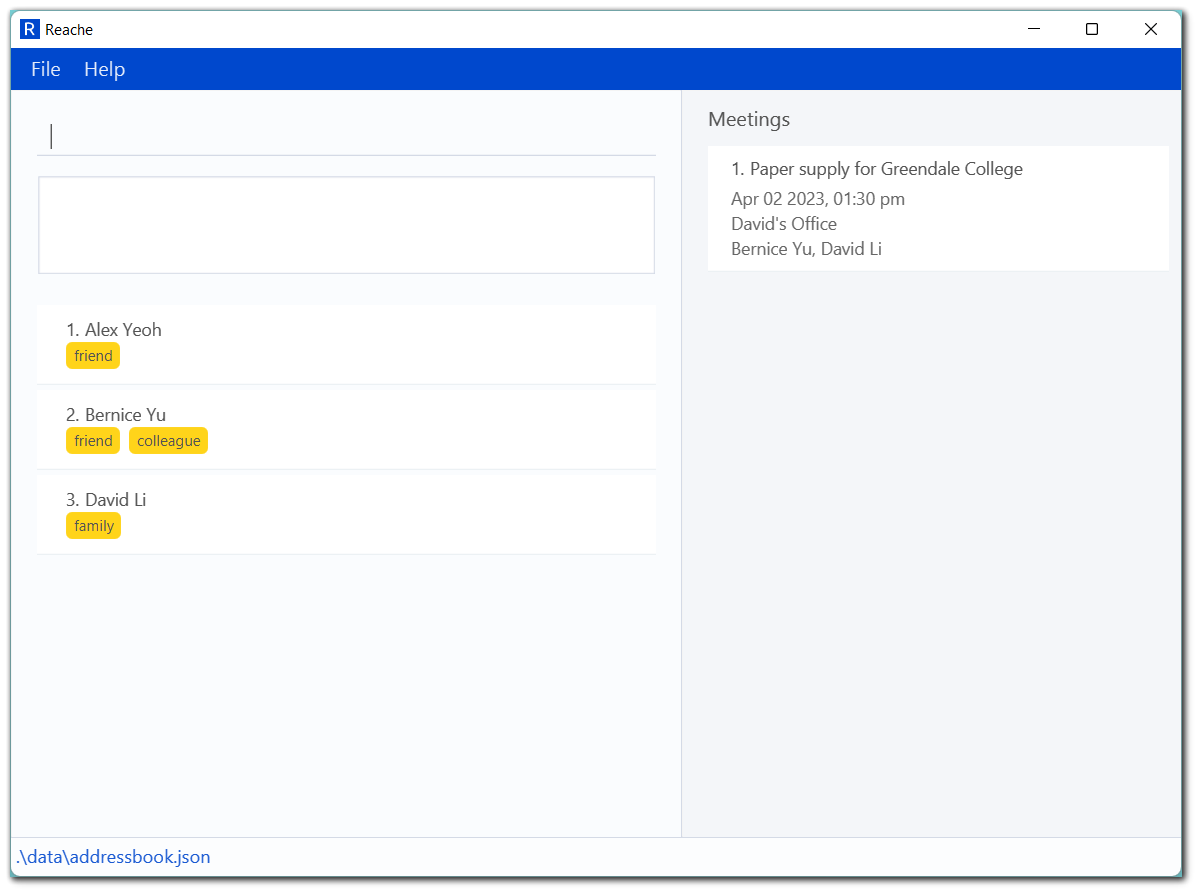 Since this is the first time you are using Reache, it loads the sample contacts as there are no actual contacts stored. Let’s start storing some real contacts in it.
- Firstly, we have to clear the sample data first. Type
clearin the command box and press Enter/Return. Press ‘Yes’ when Reache asks for confirmation.
- Now that the sample data has been cleared, we can start adding some real contacts to it.
- Begin by typing
add n/<YOUR NAME>in the command box. Press enter/return.
- You will be redirected to the Contacts Details Page as shown below:
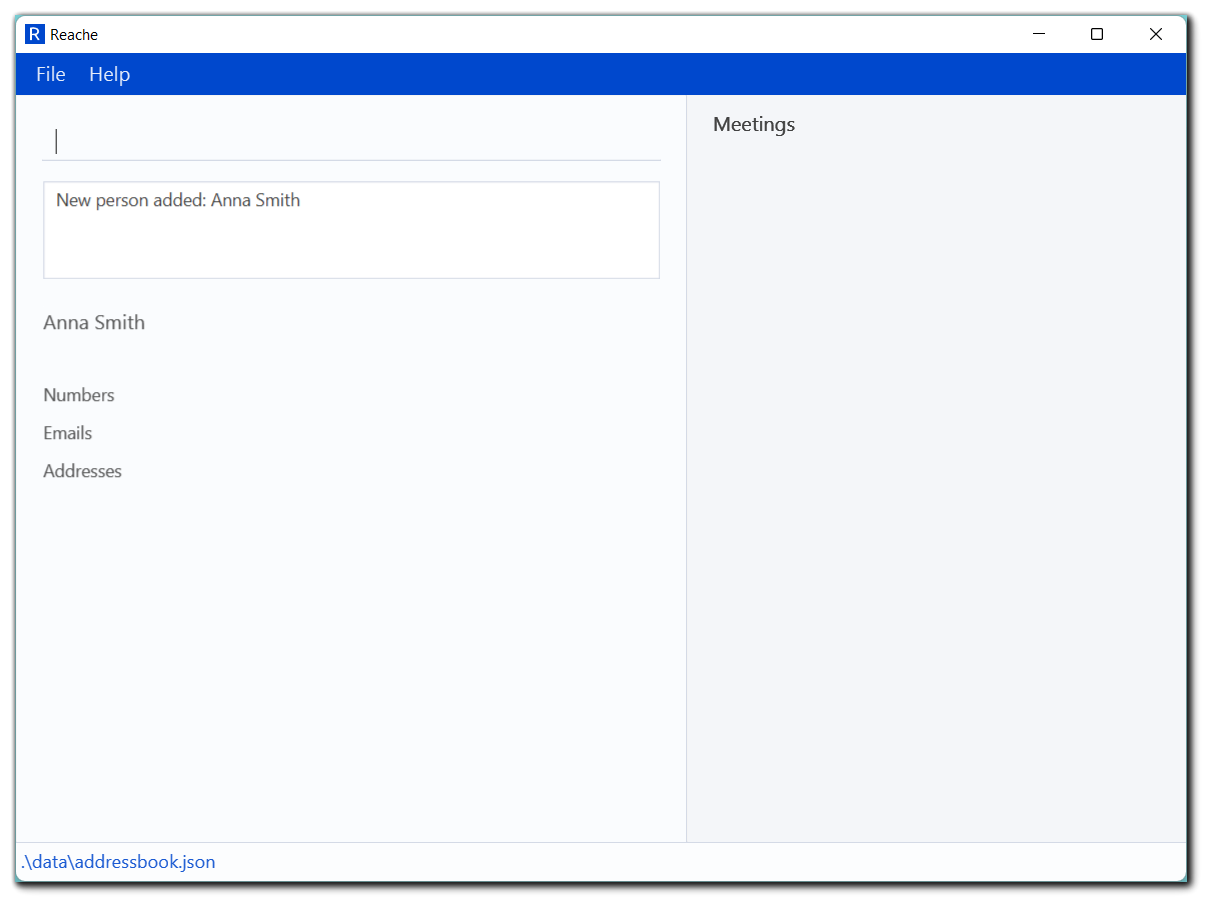 Note:
Note: editcommands can only be issued in the Contacts Details Page.
- Let’s add your company and job to it. Type
edit j/<YOUR JOB> c/<YOUR COMPANY>. Again, press enter/return. You will see your newly entered information on the page, as shown below: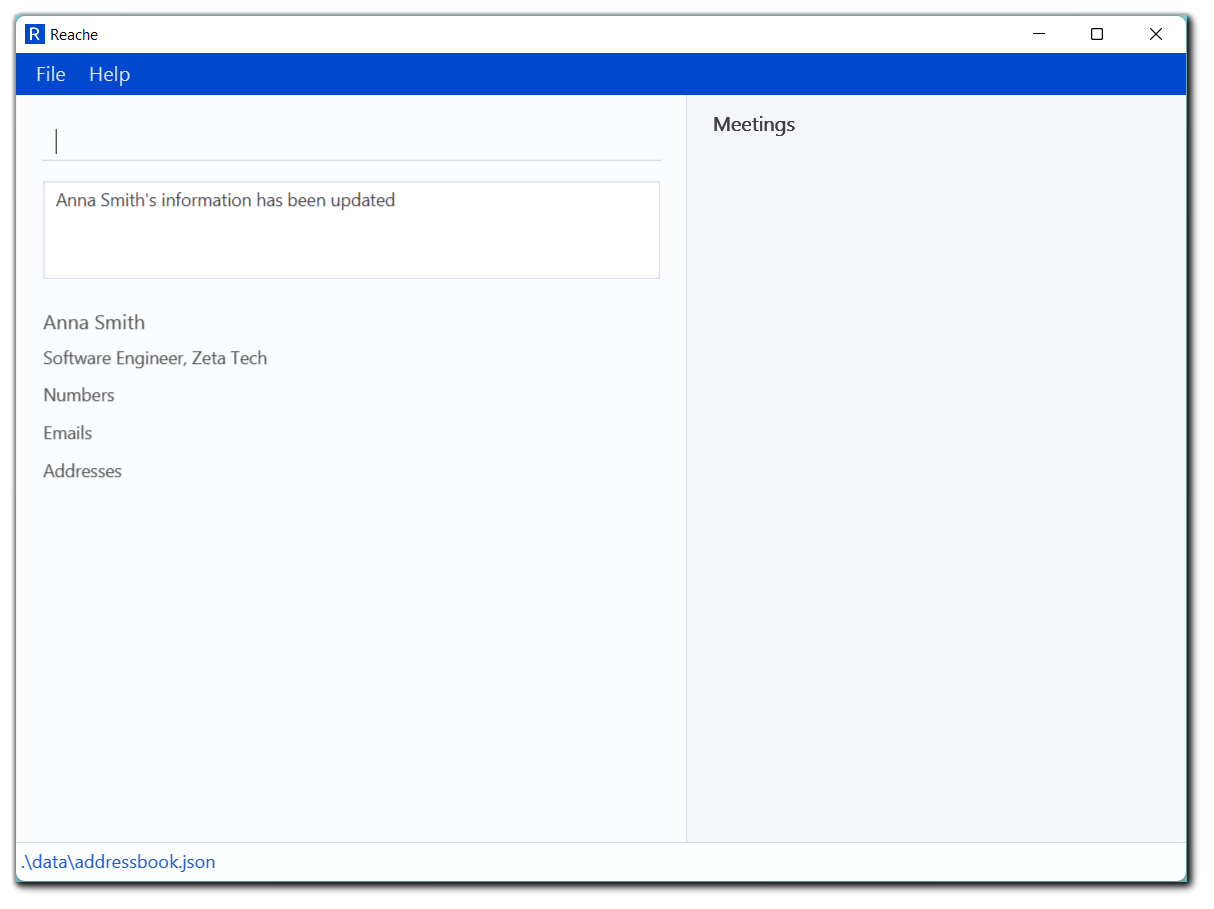
- Let’s add your emails to it. Type
edit e/<YOUR PERSONAL EMAIL> l/Personal e/<YOUR WORK EMAIL> l/Work. The updated contact details should look like this: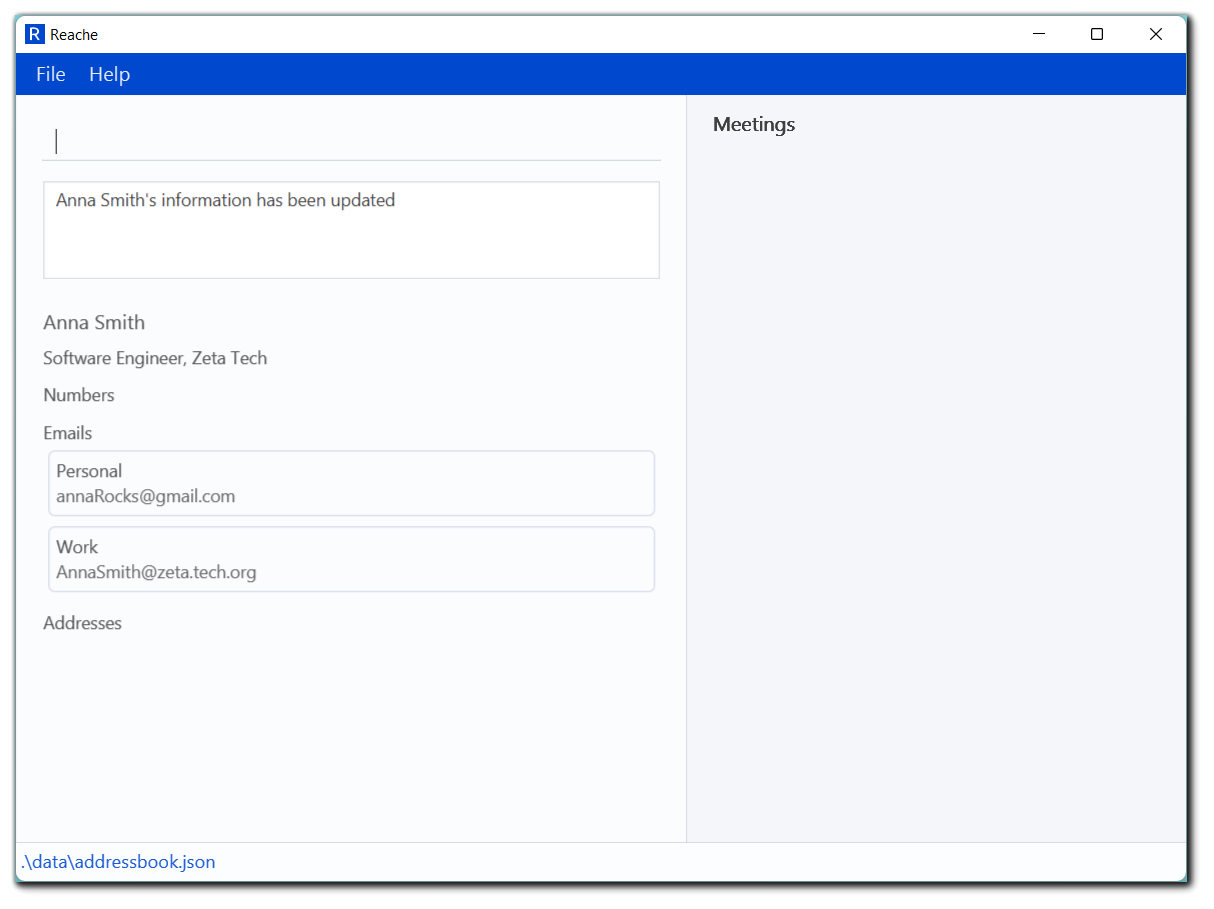
- Let’s add your number to it. Type
edit ph/<YOUR MOBILE NUMBER> l/Mobile.
- Finally tag yourself using
edit t/me. Your final Contact Details Page should look like this: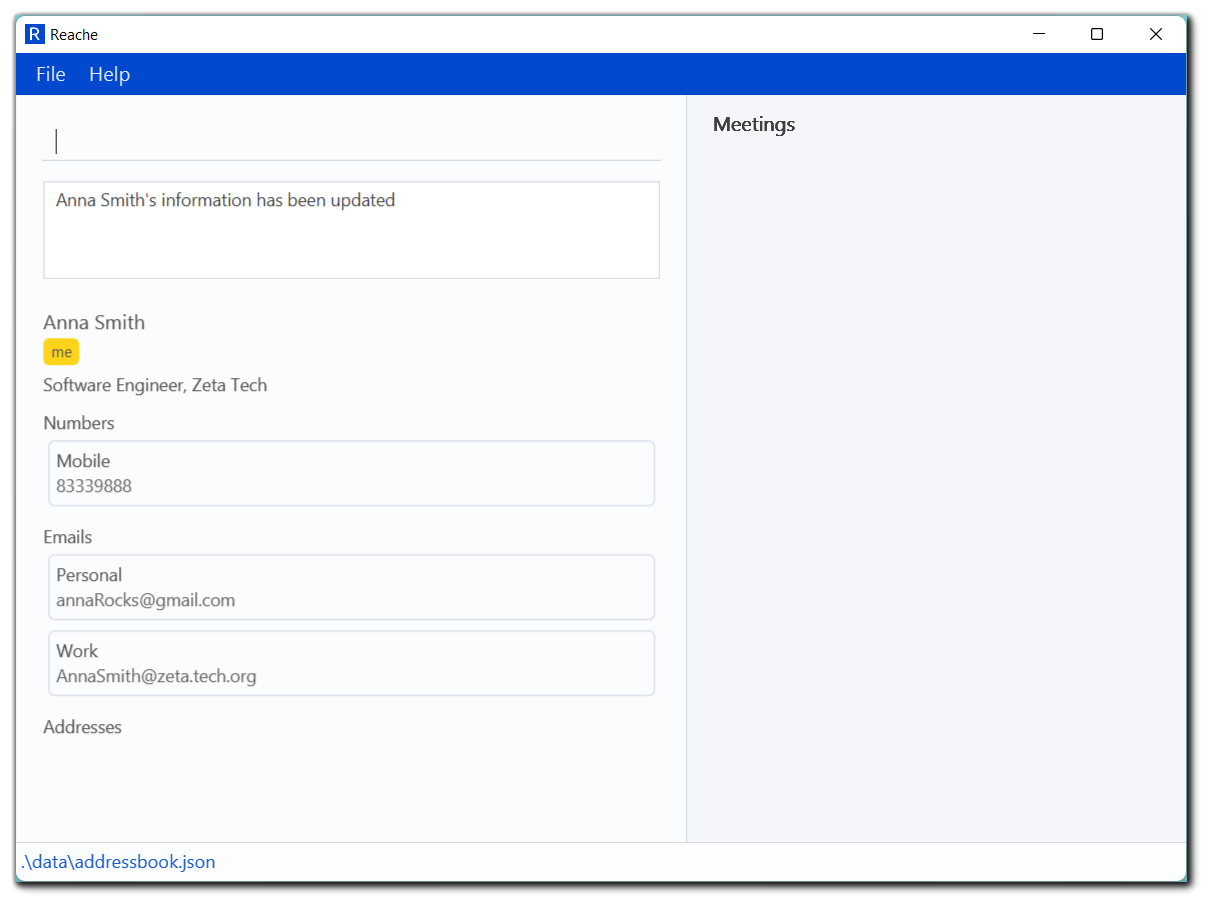
- Now type
backin the command box to return to the Home Page. Your Home Page should look like this: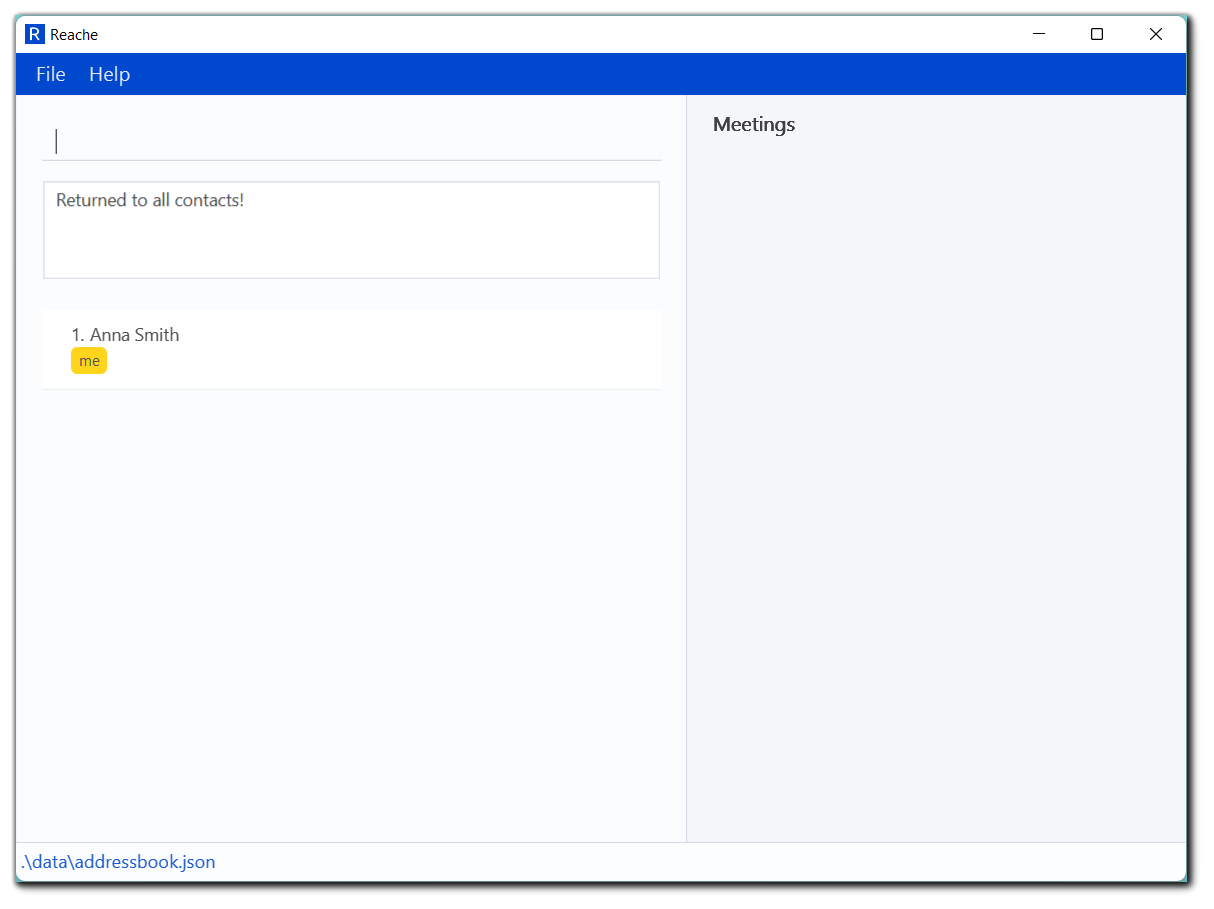
- Now type
view 1in the command box to navigate to your contact details.
- Use more
editcommands to edit your details as you wish. When you are done, typebackto save the data and return to the Home Page.
- As additional practice, try adding more contacts using
addandedit. When you are done, typelistto view all saved contacts.
2.3.2 Tutorial 2: Managing Meetings with Reache
Let’s see how you can manage your meetings with Reache.
In this tutorial, you will be scheduling a meeting with yourself on your next birthday at 12:01 AM.
Note: You must have completed Tutorial 1: Managing Contacts with Reache.
- In the command box, type
find t/meto find yourself in the contacts list. If you followed Tutorial 1 correctly you should see your name as the first search result.
- Now, type
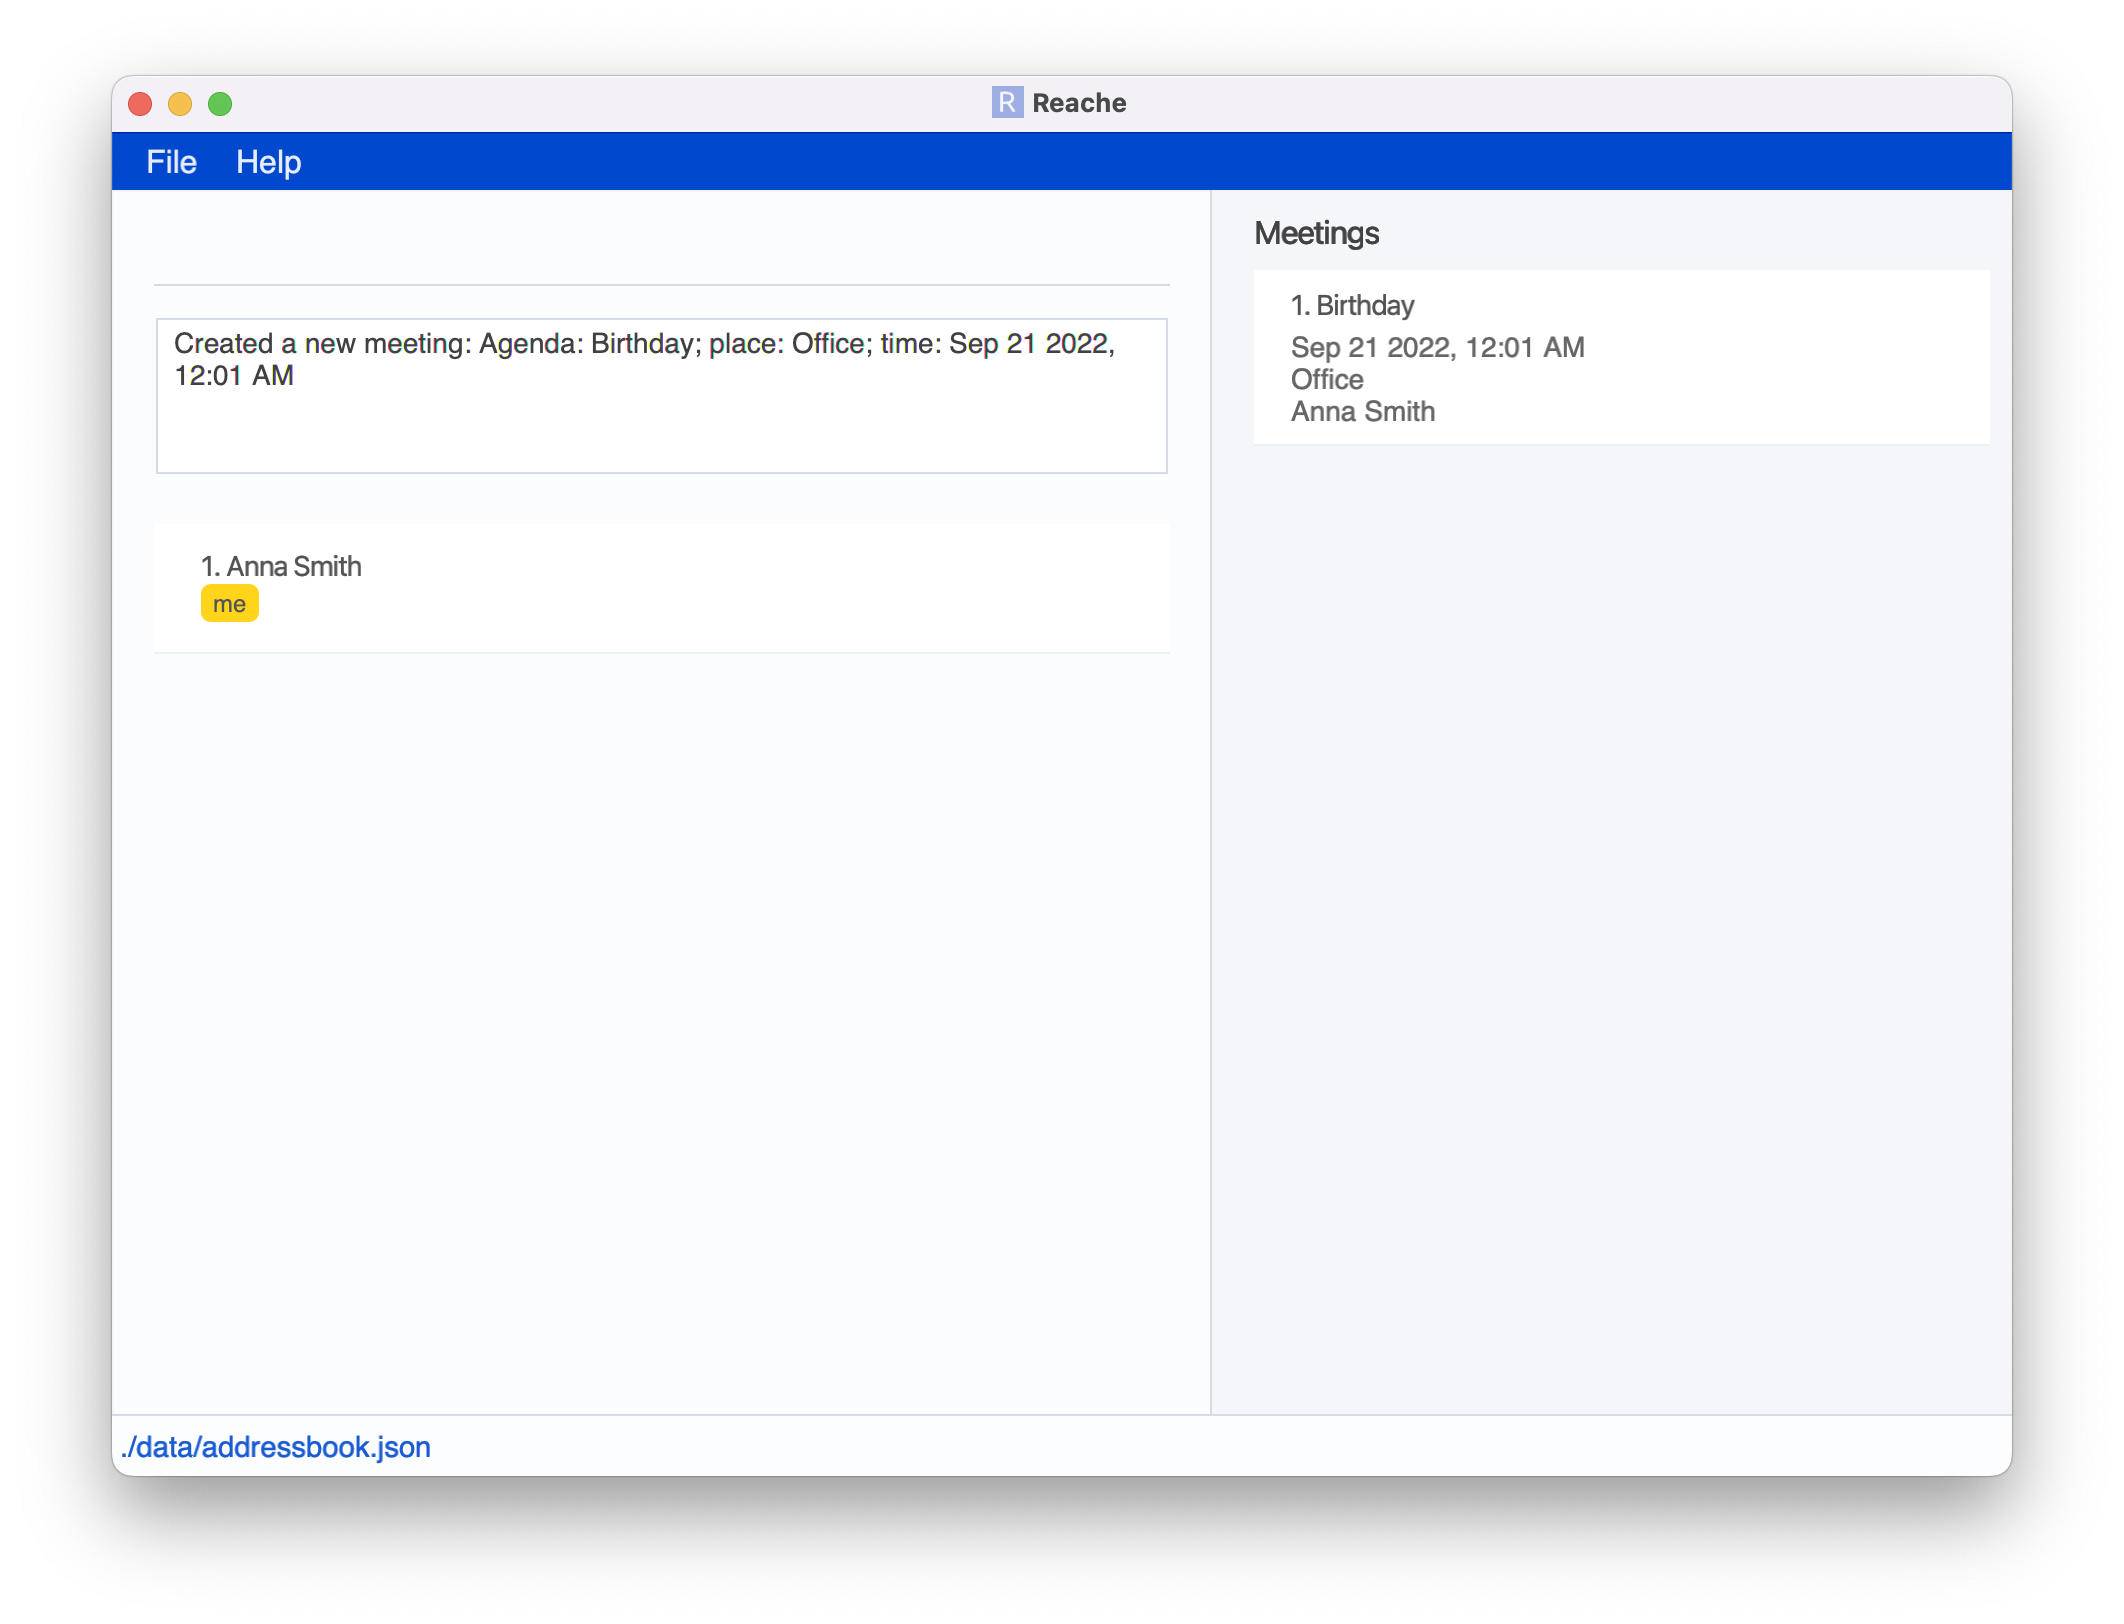
meet for/Birthday in/Office on/<YOUR BIRTHDAY IN DD-MM-YYYY> 00:01 with/1.
- You will see your newly created meeting in the right panel, like so:
- Let’s say you want to update your meeting to invite your best friend. Add their contact if you have not done so.
- Type
listto see a list of all you contacts.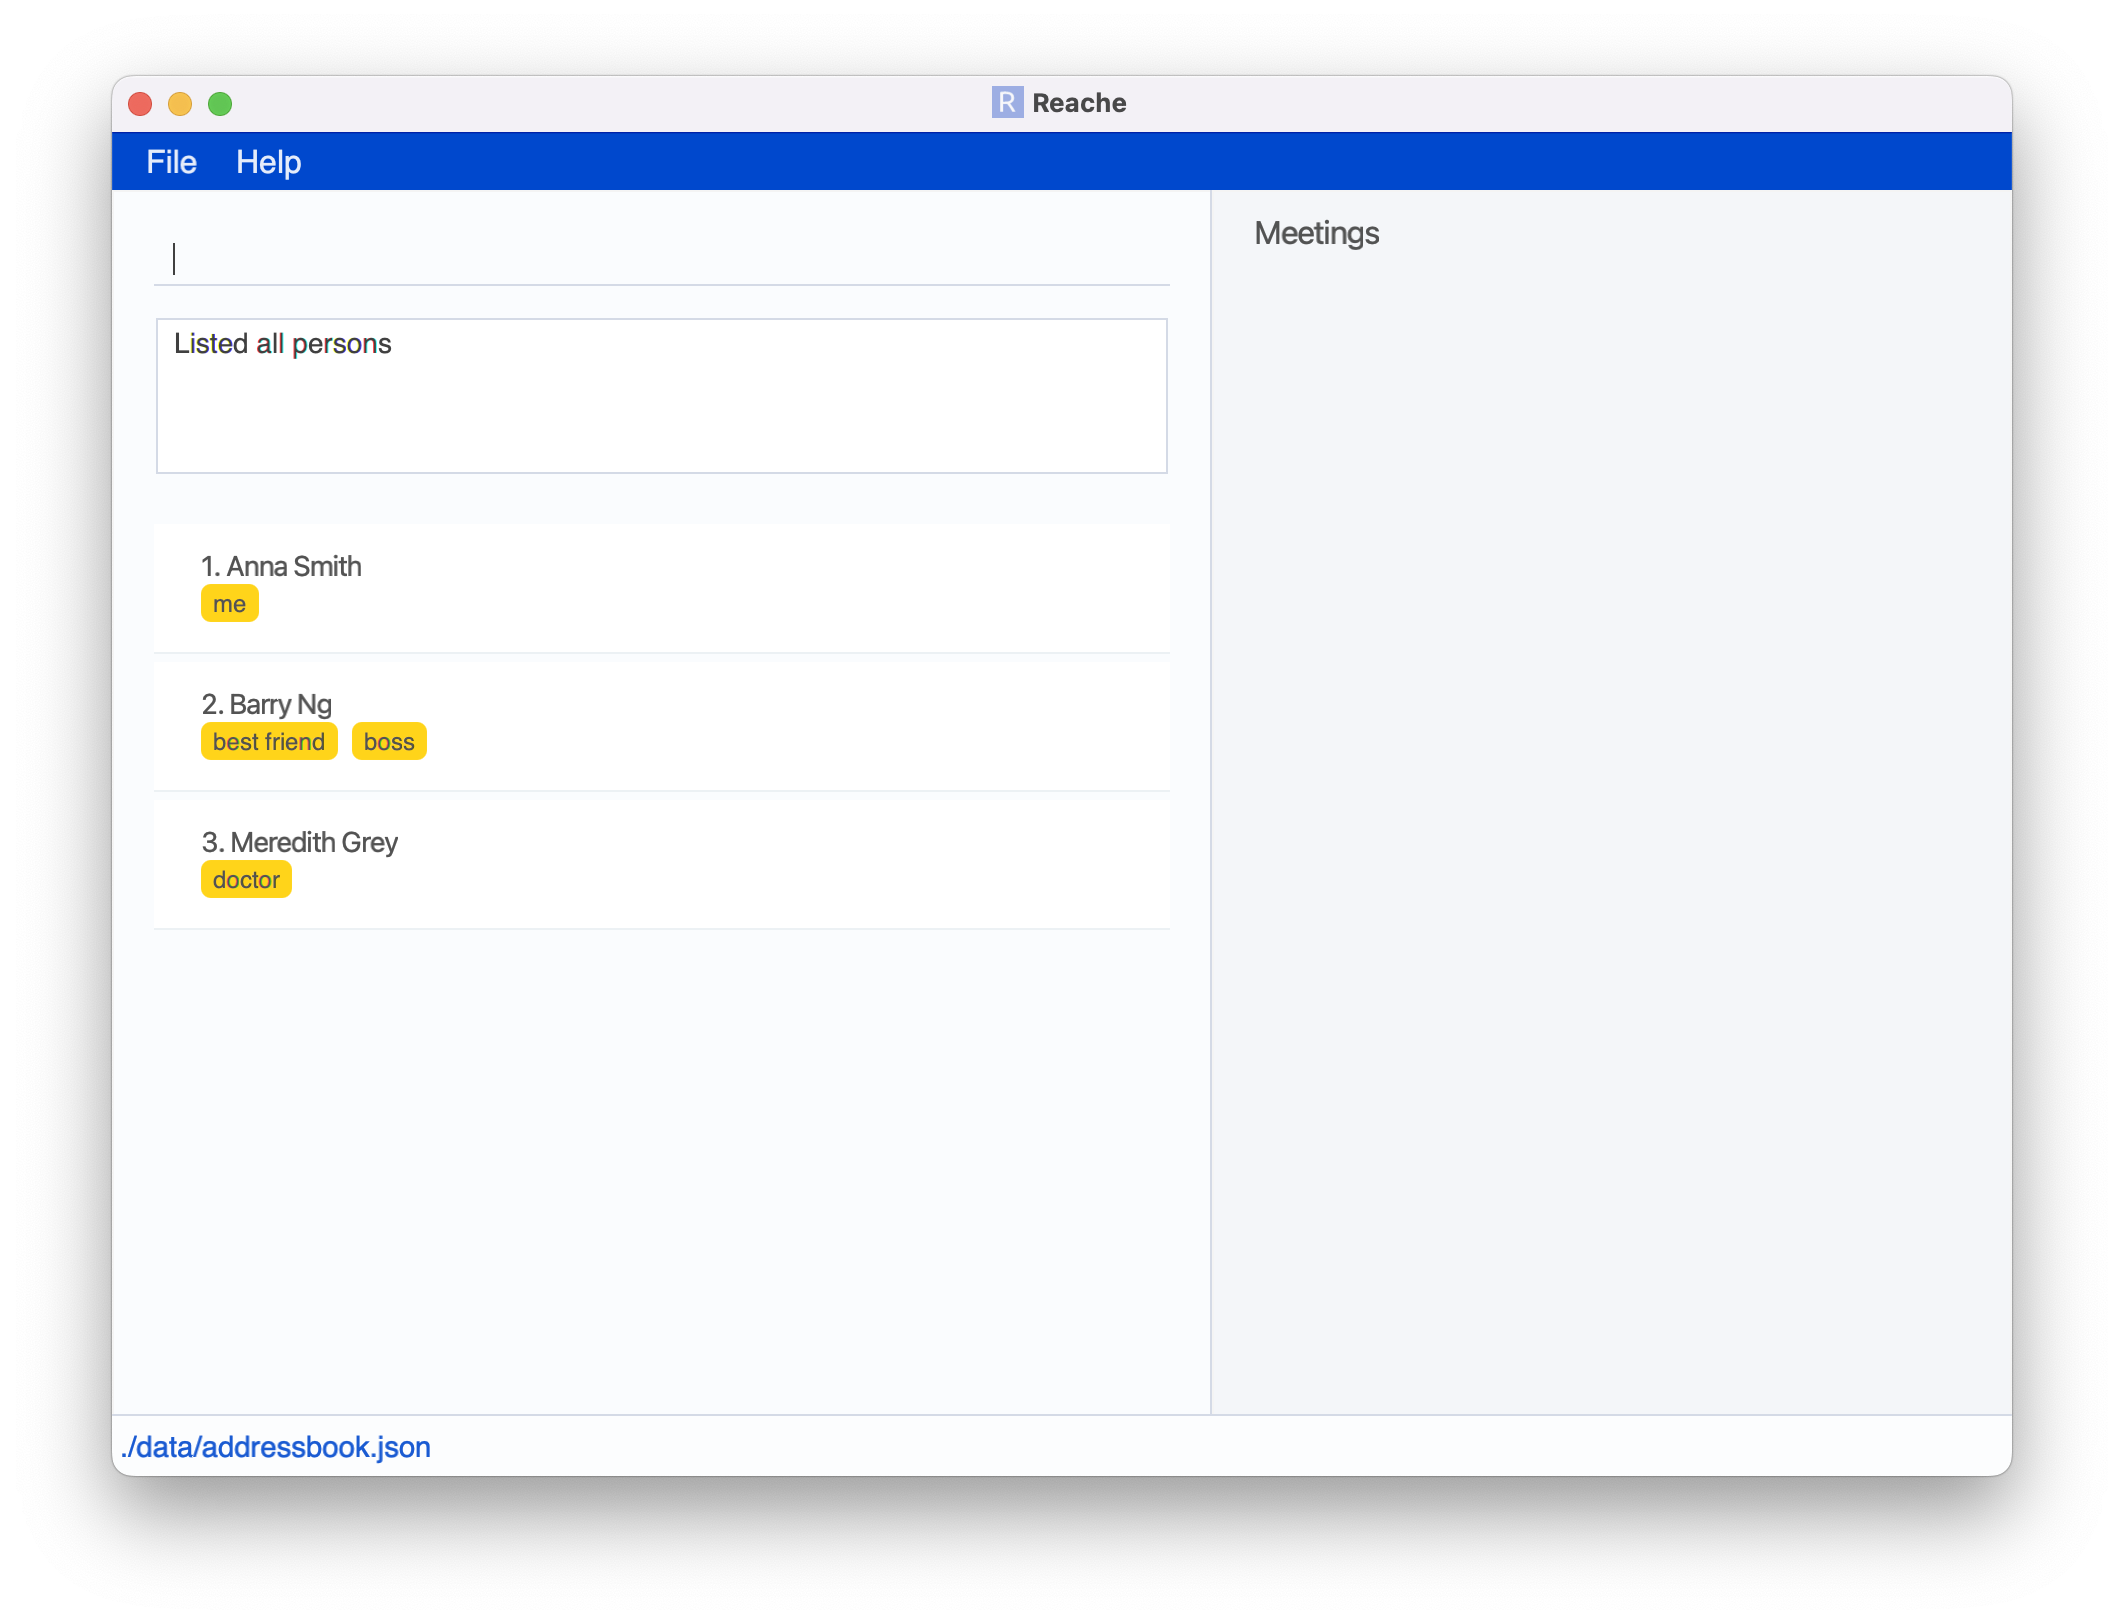 As you can see, for this particular user, their best friend
 Barry Ngis at index position2. Similarly, find the position of yourself and your best friend.
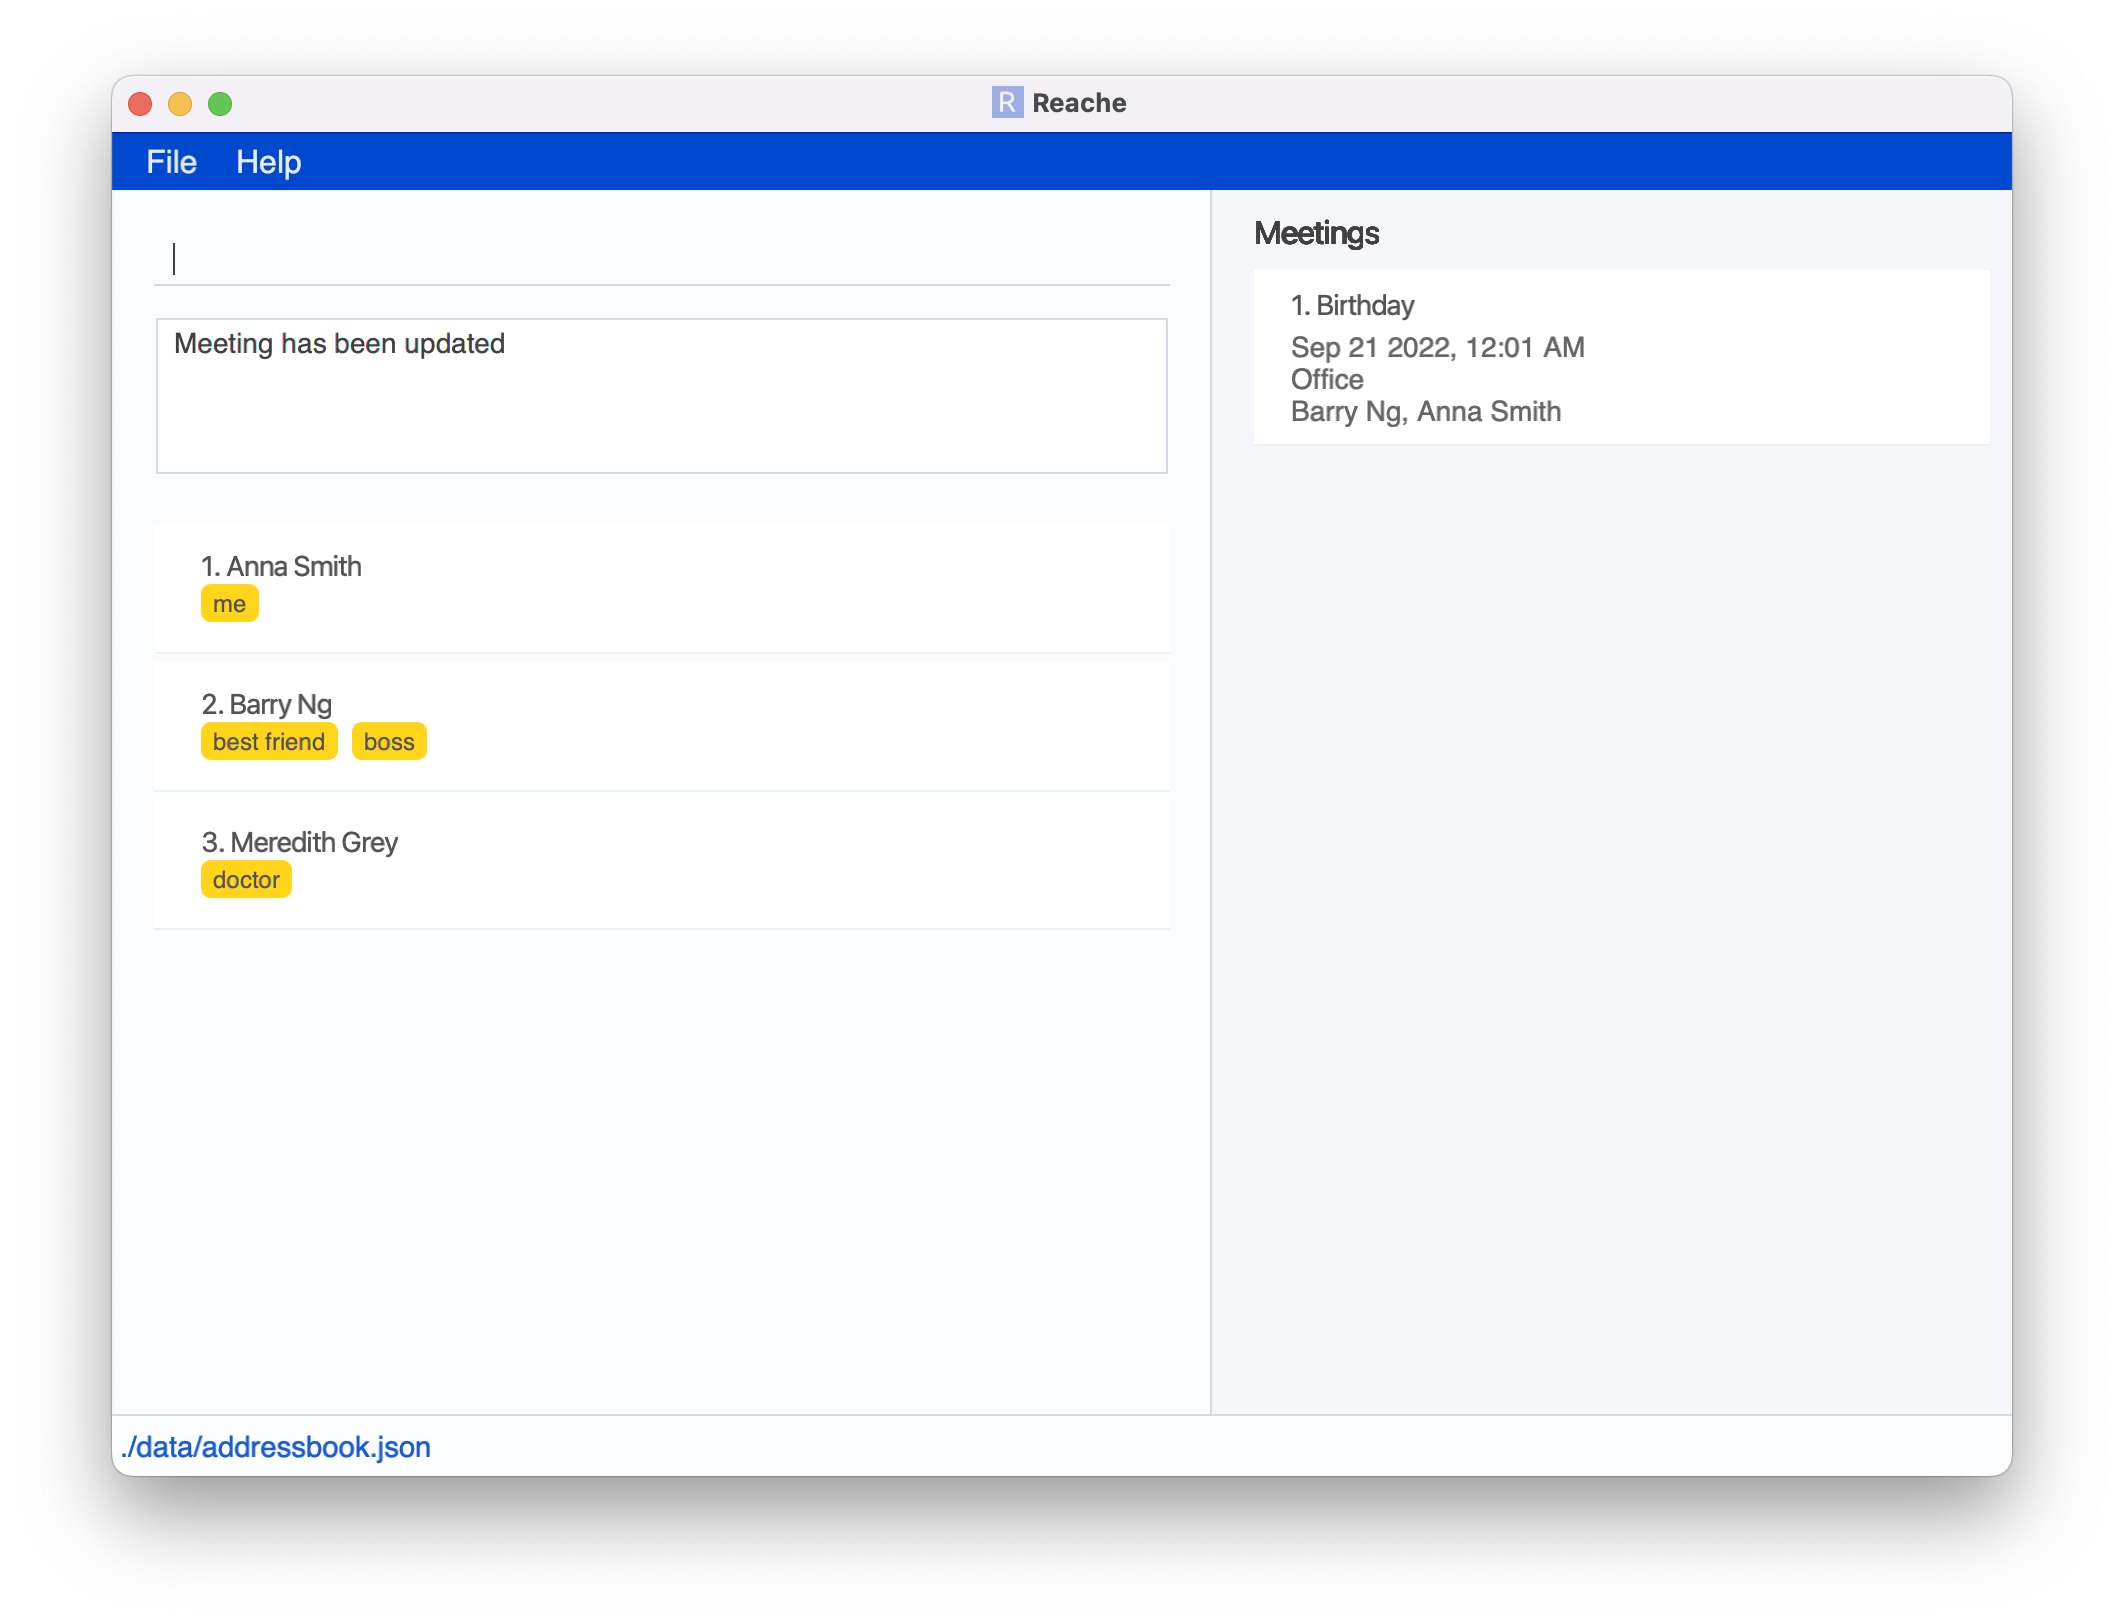
- Type
update <BIRTHDAY MEETING INDEX> with/<YOUR INDEX> <YOUR BEST FRIEND'S INDEX>. For example, this user would typeupdate 1 with/1 2. The updated meeting panel should look like this:
- Let’s say you change your mind and want to cancel this meeting.
- Type
cancel 1. The meeting will disappear from the panel, like so: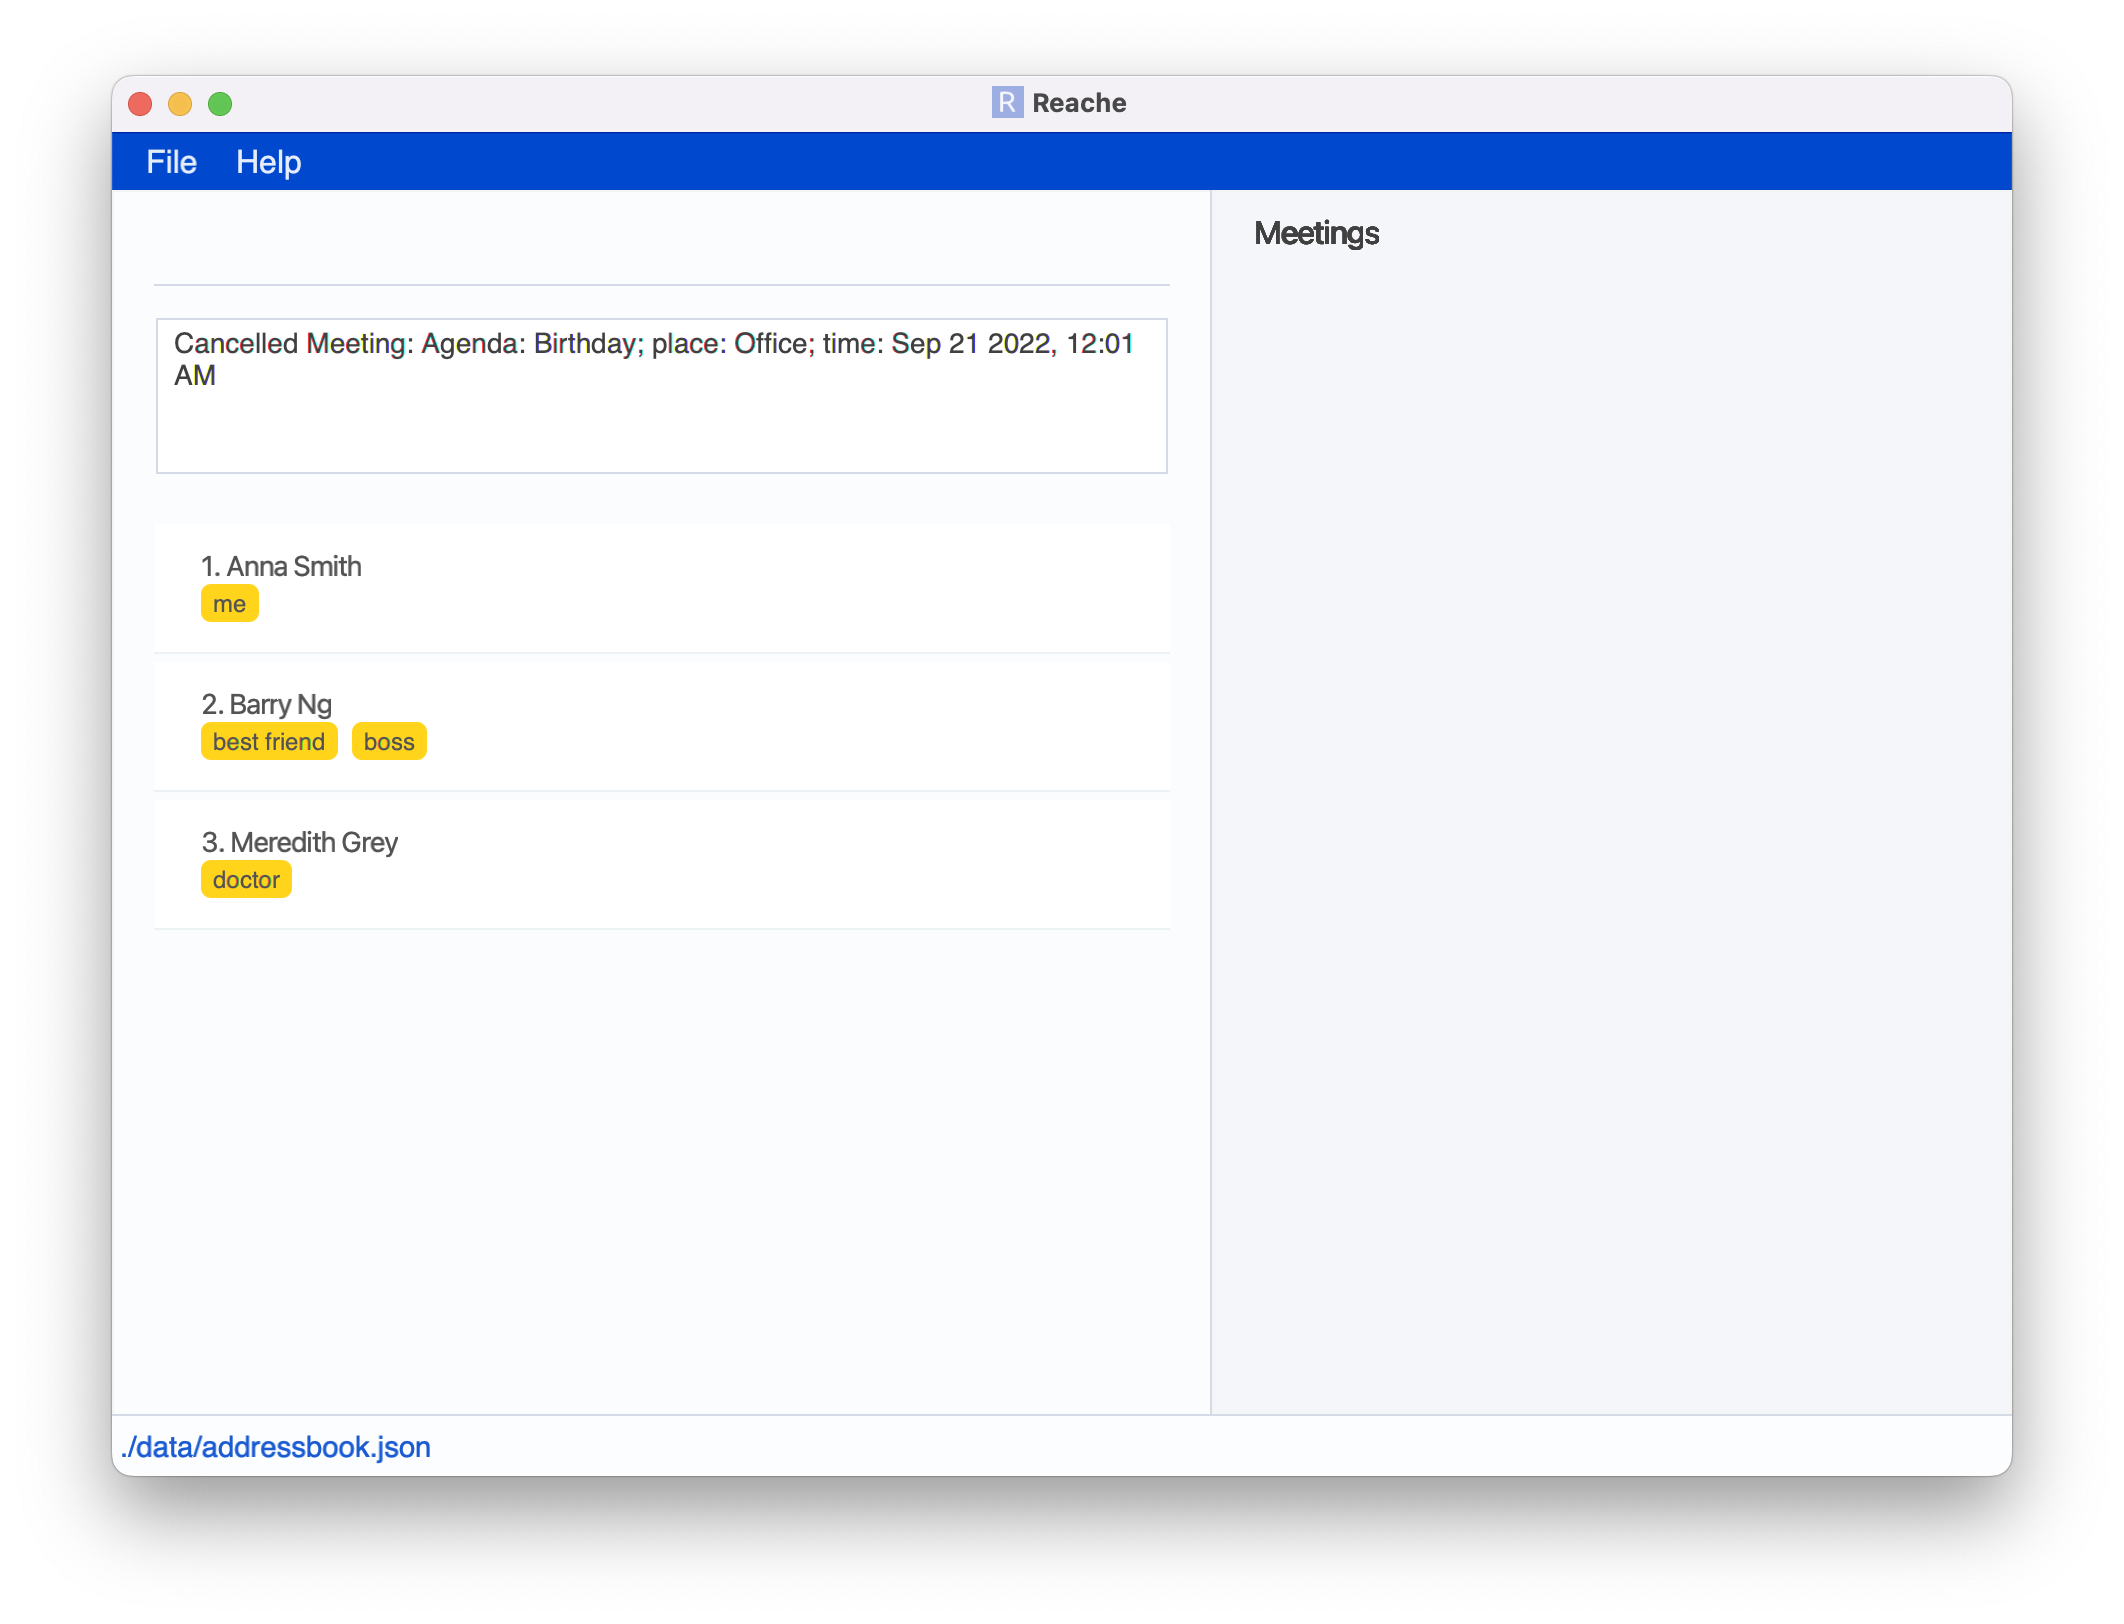 Now you are all set to manage your contacts and meetings using Reache!
3. Features
![]() Notes about the command format:
Notes about the command format:
| Symbol | Meaning |
|---|---|
| … | Indicates that the preceding entry can be provided multiple times. |
| / | Used to indicate a label for the preceding field. Labels are optional and if not provided, a default label will be assigned. E.g. ph/ 12345678 l/personal labels the given number as “personal”. |
| <…> | Indicates the field that the user should provide in that area |
-
Words in
<UPPER_CASE>are the fields to be supplied by the user.
e.g. inadd n/<NAME>,NAMEis a field which can be used asadd n/Alex Dunphy. -
Items in square brackets are optional.
e.gn/NAME [t/TAG]can be used asn/Alex Dunphy t/Likes Scienceor asn/Alex Dunphy. -
Items with
...after them can be used multiple times including zero times. e.g.[ph/<PHONE_NUMBER> l/<LABEL>]...can be either ignored, or used asph/12345678 l/personal,ph/90123456 l/office ph/78901234etc. -
Fields can be in any order.
-
l/is used to label fields. They are optional.
3.1 Managing Contacts
3.1.1 Adding a contact: add
Add a person to your contact list by specifying details such as:
- Name
- Job title
- Company
- Tag(s)
- Pronoun(s)
- Phone number(s)
- Email address(es)
- Physical address(es)
Note:
- When adding contacts, ‘name’ is the only compulsory field.
- You can add optional labels to your contact’s phone numbers, email addresses and physical addresses.
- Command words for the fields that can be added are given under the 5. Contact Fields Summary section.
Format: add n/<NAME> [ph/<PHONE_NUMBER> l/<LABEL>]... [e/<EMAIL> l/<LABEL>]... [a/<ADDRESS> l/LABEL]... [t/TAG]...
Example: add n/Alex Dunphy t/friend
3.1.2 Editing a contact: edit
On the Contact Details Page, modify the details of the person displayed. The fields that can be added/edited are given in the 5. Contact Fields Summary section.
Format: edit <ANY NUMBER AND TYPE OF FIELDS IN ANY ORDER>
Example: edit n/Alex ph/98765432 t/has kids
Note: Editing a field with the same category/label as an existing entry will overwrite it with the new one.
3.1.3 Deleting a field: del <FIELDS>
On the Contact Details Page, delete any specific contact information of the person by specifying the field (and label) you want to delete. Command words for the fields that can be deleted are given in the 5. Contact Fields Summary section.
-
<FIELD>refers to the contact field you wish to delete, as indicated by its command word. - Without a
<LABEL>, the command will delete all information stored in<FIELD>.
Format: del <FIELD 1> [<LABEL 1>] [<FIELD 2> <LABEL 2>...]
Examples:
-
del ph/ personal- Deletes the personal phone number of the contact. -
del a/- Deletes all addresses of the contact. -
del e/ Official- Deletes the ‘Official’ email of the contact. -
del pr/ her- Deletes the ‘her’ pronoun of the contact. -
del ph/ t/- Deletes all phone numbers and all tags of the contact.
3.1.4 Deleting a contact: del <INDEX>
Delete a contact from your address book by specifying their index in the displayed contacts list.
Format: del <INDEX NO>
Example: del 66
3.1.5 Clearing your address book: clear
Clear all your contacts and meetings from the address book.
Format: clear
3.1.6 Editing the data file
Reache data is saved as JSON files at /data/addressbook.json and /data/meetingbook.json. Advanced users are
welcome to update data directly by editing the data files.
3.1.7 Saving changes
Reache saves changes to the hard disk automatically after any command. So there is no need for you to save manually.
3.2 Finding Contacts
3.2.1 Finding contacts: find
Find a person based on any contact field by providing search keywords. Searchable fields can be found in the 5. Contact Fields Summary section.
Note:
- All contact fields are searchable.
-
findexpects at least one keyword to match.
Format: find <OPTIONAL_FIELD> <KEYWORDS>
- The search is case-insensitive. e.g
bellawill matchBeLLa. - The order of the keywords does not matter. e.g.
Bella Hadidwill matchHadid Bella. - Only full words will be matched e.g.
Bellwill not matchBella. - Persons matching at least one keyword will be returned, e.g.
Bella Hadidwill returnGigi Hadid,Bella Swann. - In case the field is not specified/invalid, all fields are searched.
Examples:
find c/Tesla SpaceX Finds all contacts who work in Tesla or SpaceX.
find n/Katy Cathy Cate Finds all contacts with the name Katy or Cathy or Cate.
find t/supplier Finds all contacts who are tagged as Supplier.
find Alexandra Finds all contacts who have Alexandra somewhere in their contact information for any of their fields.
3.2.2 Listing all contacts: list
View a list of all your contacts in the address book. This command will be useful after a find command to see all
your contacts again on the Home Page.
Format: list
3.2.3 Viewing a person’s full details: view
View a certain contact’s information and your meetings with them by specifying their index in the displayed contacts list. This will take you to the Contact Details Page and allow you to edit their fields as well.
Format: view <INDEX NO>
Example: view 34
3.2.4 Returning after viewing a person’s full details: back
Return to the Home Page after viewing and/or editing a person’s details from the Contact Details Page.
Format: back
3.3 Managing Meetings
3.3.1 Creating a meeting: meet
Create a meeting by specifying the following information:
- Agenda
- Meeting place
- Meeting date and time: in DD-MM-YYYY HH:mm format
- Attendees: in the form of index numbers of people on the displayed list
Note:
- All fields are compulsory.
- Meeting time must be in the future.
- Reache will delete expired meetings upon reloading the application to avoid cluttering.
Format: meet for/<AGENDA> in/<MEETING PLACE> on/<MEETING DATE AND TIME> with/<ATTENDEE 1 INDEX> [<ATTENDEE 2 INDEX>]…
Example: meet for/Project Discussion in/UTown on/28-04-2022 13:30 with/1 3 4
3.3.2 Updating meeting details: update
Update any of the meeting’s details by indicating the following:
- Meeting index: The index of the meeting you want to edit on the meetings list
- Any of the meeting details given under 6. Meeting Fields Summary.
Format: update <MEETING INDEX> [in/<MEETING PLACE> on/<MEETING DATE AND TIME> with/<ATTENDEE 1 INDEX>...]
Example: update 2 in/COM2 on/29-04-2022 20:00
3.3.3 Canceling a meeting: cancel
Cancel a meeting by specifying its index on the meetings list.
Format: cancel <MEETING INDEX>
Example: cancel 2
3.3.4 Canceling all meetings: cancel-all
Clear your meetings list by canceling all meetings.
Format: cancel-all
3.4 Viewing help: help
If you need help while using Reache, use this command to get a link to the Reache user guide.
Format: help
3.5 Exiting the program: exit
Exit the Reache application.
Format: exit
4. Command Summary
4.1 Home Page
| Action | Format & Example |
|---|---|
| Add Contact | Format: add n/<NAME> Example: add n/Alex Dunphy
|
| Delete Contact | Format: del <INDEX NO> Example: del 88
|
| Clear Address Book | Format: clear
|
| Find Contacts | Format: find <FIELD> <VALUE> Example: find n/ Michael Scott
|
| View Contact | Format: view <INDEX> Example: view 5
|
| List | Format: list
|
| Create Meeting | Format: meet <ALL FIELDS IN ANY ORDER> Example: meet for/Project Discussion in/UTown on/28-04-2022 13:30 with/1 3 4
|
| Update Meeting | Format: update <MEETING INDEX> <ANY FIELDS IN ANY ORDER> Example: update 2 in/COM2 on/29-04-2022 20:00
|
| Cancel Meeting |
Cancel specific meeting Format: cancel <MEETING INDEX> Example: cancel 2 Cancel all meetings Format: cancel-all
|
| Help | Format: help
|
| Exit | Format: exit
|
4.2 Contact Details Page
| Action | Format & Example |
|---|---|
| Edit Contact Info | Format: edit <ANY NUMBER AND TYPE OF FIELDS IN ANY ORDER> Example: edit n/Michael J Wolf pr/her j/Farmer c/FarmingInc ph/999 l/Police t/friend ph/123456
|
| Delete Contact Info | Format: del <ANY NUMBER AND TYPE OF FIELDS IN ANY ORDER> Example: del ph/ personal e/ t/
|
| Back | Format: back
|
| Help | Format: help
|
| Exit | Format: exit
|
5. Contact Fields Summary
| Field | Mandatory | Format & Example |
|---|---|---|
| Name | Yes | Format: n/<NAME> Example: n/Alex Dunphy
|
| Phone Number | No | Format: ph/<NUMBER 1> l/<LABEL> ph/<NUMBER 2> l/<LABEL>... Example: ph/98765432 l/Personal ph/9753468 l/Office
|
| Email Address | No | Format: e/<EMAIL 1> l/<LABEL> e/<EMAIL 2> l/<LABEL>... Example: e/alex@reache.com l/Official e/alex98@gmail.com
|
| Physical Address | No | Format: a/<ADDRESS 1> l/<LABEL> a/<ADDRESS 2> l/<LABEL>... Example: a/28 Francis Mine, Sacramento, CA - 654321 l/Home
|
| Company | No | Format: c/<COMPANY> Example: c/Tesla
|
| Job Title | No | Format: j/<JOB TITLE> Example: j/Software Engineer
|
| Tags | No | Format: t/<TAG 1> t/<TAG 2>... Example: t/MediaContact t/HasKids
|
| Pronouns | No | Format: pr/<PRONOUNS> Example: pr/They pr/Them
|
6. Meeting Fields Summary
| Field | Mandatory | Format & Example |
|---|---|---|
| Agenda | Yes | Format: for/<AGENDA> Example: for/Project Consulation
|
| Meeting Place | Yes | Format: in/<MEETING PLACE> Example: in/Zoom
|
| Meeting Time | Yes | Format: on/<MEETING TIME AS DD-MM-YYYY HH:mm> Example: on/14-04-2022 14:00
|
| Attendees | Yes | Format: with/<ATTENDEE 1 INDEX>... Example: with/1 3 5
|